Wednesday, September 30, 2009

Client Access License (CAL)

If your company's workstations are networked, you will utilize a network server and the workstations on the network will access that server(s) software to perform certain functions such as file and print sharing. In order to legally access this server software, a client access license or CAL may be required. A CAL is not a software product; rather it is a license that gives a user the right to access the services of the server.

Due to the technical nature of server products, CAL licensing can be a complicated area. We have created the following information to help you determine the need for CALs. This guide is for reference purposes only and should not be used for purchasing decisions. Before purchasing you should visit the "How to Buy" section for each product and consult your local reseller.

The table below provides information on a variety of Microsoft Server products and the licensing of CALs as it relates to those products. Before you read about how CALs apply to each product, referring to the sections of this guide on "Per Seat", "Per Server", "Per Processor", and "Per User" licensing will be helpful.

Per Seat Licensing
Per Server Licensing
Per Processor Licensing
Per Mailbox Licensing

Per Seat Licensing

With Per Seat licensing (sometimes referred to as "Per Device or Per User"), you need a separate CAL for each unique device (or user, if applicable) that accesses the server to avail of services such as file or print or to run Microsoft server applications. Once you choose to deploy a Microsoft server product in Per Seat mode, your choice is permanent. The following is a diagram illustrating Per Seat licensing:

Diagram 1 - Per Seat Licensing


Per Seat licensing is available for the following Microsoft products in the server software pool:

  • Class Server
  • Exchange Server
  • Office Project Server
  • Office SharePoint Portal Server
  • Office Live Communications Server
  • SQL Server
  • Systems Management Server
  • Terminal Server
  • Windows Rights Management Server
  • Windows Server
  • Windows Small Business Server

Per Server Licensing

With Per Server licensing, a specified number of CALs are associated with a particular server. The number of devices that can legally access that server simultaneously is limited in Per Server licensing to the number of CALs purchased for that particular server. For example, if your organization chooses to deploy Microsoft Windows Server 2003 in Per Server mode, purchasing 50 CALs will allow up to 50 unique devices to be connected to that server simultaneously. Because CALs in Per Server deployments are not permanently associated with a specific device, if your organization adds another Windows Server, and remains deployed in Per Server mode, separate Windows Server CALs will be required to access the second server. With Per Server deployments, the system administrator designates the number of CALs that apply to the server during setup, based on the number that has been purchased for that server. The following is a diagram illustrating Per Server licensing:

Diagram 2 - Per Server Licensing

Per Server licensing is available for Windows Server.

Per Processor Licensing

Some of the server products are available Per Processor. Under the Per Processor model, you acquire a Processor License for each processor in the server on which the software is running. A Processor License includes access for an unlimited number of users to connect from either inside the local area network (LAN) or wide area network (WAN) or outside the firewall. You do not need to purchase additional server licenses, CALs, or Internet Connector Licenses.

Per Mailbox Licensing

If you are an education customer using Exchange Server, you have the additional option of deploying licenses in Per Mailbox mode. With this model, you acquire one CAL for each unique mailbox accessing Exchange Server. If you choose the Per Mailbox mode, you may not later change to Per Seat mode. However, if you initially choose the Per Seat mode, you may transition one time only to Per Mailbox mode. This choice is then permanent.


Tuesday, September 29, 2009

Introduction To Nikon D3000

The Nikon D3000 is a new entry-level digital SLR camera designed to make photography simple and accessible. Aimed at the complete beginner, the D3000 is primarily aimed at anyone who wants to take photos without having to worry about what the camera is doing. The intelligent Guide Mode asks you about the image you want to capture and automatically optimizes the settings for the best possible results. When you’ve gained more experience, you can then use the Guide Mode to find out how to adjust the settings yourself. The Nikon D3000 also features a 10.2 megapixel sensor, EXPEED processing system, 3-inch LCD screen, 3 fps continuous shooting and 11-point autofocus system. The D3000 is available now for £429.99 / €522.00 body-only or £499.99 / €607.00 / $599.95 with the 18-55mm VR kit lens.

Ease of Use

Rather than packing entry-level digital SLRs full of extraneous features that most of their target audience will never use, it seems manufacturers are now majoring on winning over owners of camera phones and compacts and introducing them to the more professional results achievable via DSLRs - with, they state, the minimum of fuss. A case in point is the new beginner targeted D3000 from Nikon, which upgrades the existing D60 model and is little brother to the pricier D5000, which most notably has the added features of video and vari-angle rear screen.

For a body-only suggested UK retail price of £429 (or £499 with 18-55mm VR zoom supplied for our review), for the first time its maker has included what it's calling an Intelligent Guide mode, selectable via the otherwise familiar chunky top plate mode dial. This feature 'talks' - via explanatory text on the rear LCD - nervous novices through which settings need to be selected to achieve various desired results. Within this feature there's a menu choice of either 'easy' or 'advanced' operation - the latter getting more creative with advice on how to blur backgrounds and freeze motion.

The theory is that greenhorns are provided with an on board tutor and that, as they 'play' more with the camera, their knowledge level will rise and hopefully their picture taking improve. It's a neat idea that might just actually work - provided, that is, said novice doesn't just casually stick the D3000 on auto and point and shoot.

Aside from the on-board hand holding that helps set it apart (though Sony's A380 recently attempted something similar), the Nikon D3000's other main features include a 10.2 megapixel DX format CCD sensor, fixed 3-inch, 230k dot resolution back plate monitor, 3D subject tracking and 11 auto focus points spread across the frame - the latter being impressive specification for an entry level DSLR, especially as the D60 made do with a mere three AF points. Also slightly better than average for its class is a maximum continuous sequential shooting speed of three frames per second; thus equipped the D3000 therefore comes across like a snapshot model on steroids.

What this camera misses out on however is Live View plus a top mounted second LCD window to quickly review/alter settings; both to be found on admittedly pricier models higher up the Nikon range. As mentioned at the outset, there's also no HD video nor HDMI connectivity, but as this is the new budget model, such omissions are hardly surprising. That said it seems inevitable these features will trickle down to even entry-level models such as the D3000 before too long - a case in point being that you do get on-board dust reduction in the form of automatic sensor cleaning, activated on powering down the camera as a default.
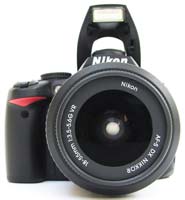
Nikon D3000 Nikon D3000
Front Rear

Held in the palm, the D3000's plastic resin construction body is only fractionally larger than Panasonic's DSLR-styled GH1, which of course also prides itself on being a marvel of miniaturization. With the 18-55mm zoom attached it's still sufficiently lightweight to, if required, fire off a shot single-handed, though gripping it in both hands of course feels more natural and acts an additional (to the VR lens) steadying influence, since like the rest of the range no built-in anti shake features.

One thing to note when you pick the Nikon D3000 up and start using it is that, though the grip is sufficiently sized for the three lower fingers to mould comfortably around it leaving the forefinger hovering over the shutter release button, the eye relief for the optical viewfinder doesn't jut out very far, which means the user's nose is pressed up against the LCD screen when using it. Said viewfinder is however sufficiently large and bright to get a good idea of detail when utilising manual focusing.

And, with the on/off switch surrounding the main shutter release button, with a thumb flick users can be up and shooting from cold in just over a second. The Nikon D3000 is equally swift to find its target courtesy of 3D subject tracking and 11 auto focus points spread across the frame, with whichever is/ are in use indicated when the shutter button is depressed to the half way point. Go on to take the shot and there's no discernable shutter lag - a full resolution JPEG committed to memory in two seconds, a RAW file in three and combination of the two taking just a mere fraction longer. So far so good then.

While front on the Nikon D3000 is visually unthreatening, the on-screen user interface you're presented with is surprisingly busy, and the more you delve into using the D3000 the more you realize it is no purely 'auto everything' camera. Incidentally, turn the camera on its side and said information display will also flip through 90° so it can be seen the 'right' way up. For those who do want to get hands on, an additional degree of creative control is provided by a Picture Control menu to be found within the camera's logically laid out and easily navigated on-screen folders - letting the user select the well saturated colours of 'Vivid' mode for example in preference to the more naturalistic Standard or Neutral - plus monochrome and pre-tweaked settings for portraiture and landscapes.

In-camera retouching is additionally offered as an alternative to editing images once downloaded to your desktop, with a new miniature mode ape-ing the effects of tilt and shift lenses in rendering people when viewed from on-high as like toy figures in a model village. Adjusted images are saved alongside the original file, with the ability to adjust colour in camera and warm up formerly 'cold' images proving particularly effective.
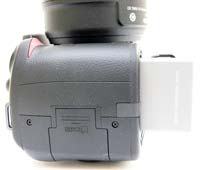
Nikon D3000 Nikon D3000
Front Rear

Unprocessed RAW file format shooting is present as an alternative to, or can be captured in tandem with, regular JPEG. However if you choose to shoot both together, only 'basic' quality JPEGs can be captured rather than the maximum 'Fine'. As expected at this level, pictures are committed to SD media card or higher capacity SDHC, and the built-in sensor cleaning prevents any undesirables intruding when swapping lenses and otherwise showing up as dust spots on images.

The competent Nikon D3000 includes the D-lighting feature consistent throughout the Nikon DSLR range, which automatically adjusts to even out tricky exposures - for example bright backgrounds and dark foregrounds that would otherwise result in a silhouette. Otherwise it's very easy to just activate the pop up flash to fill-in any shadow detail, with a hotshoe provided for attaching an optional flashgun.

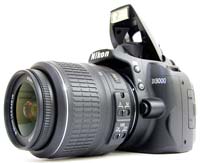
Taking a tour of the Nikon D3000 in more detail, the front is obviously nominated by the Nikon F lens mount, above which sits the built-in flash. Set into the slope of this are two operational buttons - the first logically for calling up the available flash options on the rear LCD, selected in tandem with a twist of the rear command dial that naturally falls under the thumb. The second button calls up the camera's self-timer.

Beneath this sits a prominent, springy lens release button, and, moving over to the other side of the camera we find a combined AF assist illuminator, self-timer and red eye reduction lamp nestling between the grip and the sloping ridge of the flash. Underneath the familiar red Nikon 'slash' on the grip itself is located an infrared receiver for use with an optional remote.

The top plate of the D3000 is similarly clean and unfussy, dominated by the aforementioned mode wheel, which clicks into place at each setting with just the right about of 'give'. Arranged around this are some 13 settings, comprising the grouped creative quartet of program, shutter priority, aperture priority, plus manual, the Intelligent Guide, and full Auto modes. We also get a dedicated flash off mode, so it won't automatically pop up and fire even if the lighting is poor (the flash can also of course be deactivated by pressing the dedicated flash button and twisting the command dial to the 'off' setting). Finally, six pre-optimised scene modes are thrown into the mix: portrait, landscape, child, sports, close up (macro) and night portrait, so if you want to purely point and shoot you can.
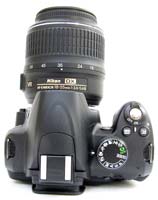
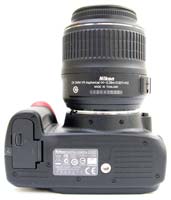
Nikon D3000 Nikon D3000
Top Bottom

Just forward of the mode dial, sitting behind the shutter release button - itself surrounded by an on/off switch - are a pair of large and identically sized buttons - the left marked 'info', with a single press logically bringing up the information display on the rear LCD that appears anyway upon power up, and the right for adjusting exposure compensation; here a broader than average +/- 5EV. Again, any adjustments are effected with an in tandem turn of the command dial, to be located top right of the camera back.

Incidentally, while the eyelets for attaching the provided camera strap are located on opposite edges of the top plate, rather than on the sides, unlike say on the Olympus E-420, these are never close enough to where you put your fingers to get in the way - even with the strap itself attached. The final thing to note on the camera's top plate is the obviously accessory shoe for optional flash, safely covered when not in use.

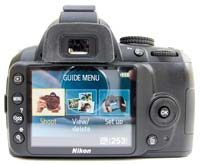
Moving to the back plate then, the Nikon D3000's 3-inch LCD dominates proceedings, above which is the previously highlighted upon eyepiece for the optical viewfinder, with dioptric adjustment slider for the myopic nestling unobtrusively into the right hand side. Again, the backplate mirrors the rest of the camera's design ethos in being visually clean and uncluttered - with less controls than might usually be found on some bridge models in fact. What's there is mostly clear, with an auto exposure/auto focus lock button to the left of the command dial we've touched upon previously.

Directly below this, dead right of centre of the LCD, is a four-way multi-selector dial, just smaller than the thumb, for tabbing through menu options and images when in review mode. At its centre is the logically located 'OK' button for effecting any changes that need to be made and below both is a dedicated delete button, denoted with familiar trashcan icon.

So far, so expected, and this continues over at the left hand side of the LCD screen with a run of four vertically arranged buttons that will be immediately familiar to users of Nikon DSLRs. From the top we have a playback button, a menu button beneath this and two further buttons again for zooming into or out from an image, as well as calling up captured shots as a series of thumbnails or requesting capture information be displayed on screen. There's also a question mark icon adjacent to the zoom button, which means that if you press it when not in image review but rather capture mode, the user gets a brief on-screen text explanation of the mode selected itself.
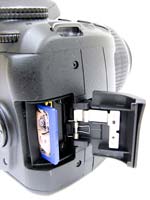
Nikon D3000 Nikon D3000
Memory Card Slot Battery Compartment

The zoom out button also doubles as an information /edit button. Press this and you'll get an overview of the settings in use at the time. Let go of it and with the multi-selector dial, settings can be changed without having to delve into the menu/s proper. Neatly, as you tab through the on-screen options in this mode, thumbnail images of the type of picture you might be looking to achieve with said changes pop up in the centre of the screen. Hence, in choosing continuous capture you're logically presented with a picture of a rollercoaster.

While that's it for the cleanly laid out camera back, to the right hand side of the Nikon D3000 we find a slide and flip open spring-loaded door covering an available slot for either SD or higher capacity SDHC card, while over at the other side of the camera, as expected we encounter ports for AV and USB out, covered by a rubber flap.

The base of the Nikon D3000 features a just slightly off-centre screw thread for attaching the unit to a tripod, alongside which, built logically into the base of the camera grip, is the battery compartment, housing the EN-EL9a rechargeable lithium ion cell provided.

Pretty much everything you'd expect to find on an entry level DSLR these days is present and correct on the D3000, with the nice extras of the Intelligent Guide and Picture Control settings, not to mention in-camera editing for those who want it. What I did miss however was the ability to implement Live View via the rear LCD, which on occasion lead less to instances of point and shoot, more point and guess when it proved tricky to bring my eye completely level with the optical viewfinder.

Still, more positively the camera is as well made as you'd expect a product bearing the Nikon logo to be, solidly constructed and with a control layout that ensures everything is readily 'to hand' and responds instantly to user input. So what of the images the Nikon D3000 delivers? Do they transcend the entry-level model's mighty minnow status, or leave it wallowing in the shallows, afraid to play with the other big fish?

Monday, September 28, 2009

Decrease the Outgoing Traffic

You have just received the web hosting service bill and this month the payment exceeded the usual sum. Web hosting provider explains that the reason is the increasing of your website monthly minimum of information exchange quote, and they recommend to decrease your website size. What is the metric of information interchange and capacity? What size of capacity is necessary for you? How to reduce an information interchange metric? Let's more in detail disassemble each of these questions.


What is "an information interchange metric"?
It is the total amount of the information transferred monthly by a site to users. Each website file has its size, e.g. 22 KB. Each time when a user downloads this file, the information interchange metric increases by to this number. The bigger is size of the uploading file and the bigger is the amount of users, the are the higher is information interchange metric.


What is the capacity?
Capacity is the amount of information which can be transferred within a certain period of time. Data transfer metric is speed showing how quickly the information from one device to another can be transferred. Information metric is usually measured in megabits (million of bits) per second or megabytes (million of bytes) per second and are marked as MBps (megabyte per second).


Bits and bytes
8 bits is 1 byte.
1,024 bytes = 1 Kilobyte (Kb).
1,024 kilobytes (Kb) = 1Megabyte (Mb or meg)
1,024 megabytes = 1 Gigabyte (GB or Gbyte or gig)


What size of capacity is necessary for you?
To define necessary size of capacity, it is necessary to count up the size of each web page, and then to multiply by quantity of pages of a site. Multiply by prospective quantity of reviews of your pages during a month. For example, the web page has two maps on 15 KB everyone, and also contains the text of of 3 KB, i.e. your page has the size of 33 KB. Now multiply this number by number of prospective page views during a month (for example, 100,000 reviews during a month). It means that for this page in a month it is required to transfer 3.3 GB information. Now output this number for each page and, thereby, you will get to know approximate size of an exchange information necessary for the site.


How to decrease the information interchange metric?
The most simple way is to decrease the website files size, namely size of images and other graphics used. For example, the webpage contains a big image (i.e.: 200 KB), which uploads each time a user opens a page. If you reduce the image size to 20 KB or remove it from your page, you reduce the information information interchange metric and increase the webpage load speed.


Websites containing MP3 music, movies, sound effects or large images require bigger capacity. Popular websites need bigger capacity as well. Information interchange metric should not be big if your website contains simple HTML pages and small images.


If you add files or page to your website calculate the total website size again. Define what amount of users you should have for the next few months. Calculate the capacity again. You may need more disk space and more size of capacity for effective website functioning. Inquire your web hosting provider whether it is possible to move to another web hosting plan which allows to increase the disk space and capacity.


Conclusion
Now you can avoid getting big tickets shock reception of the big scores for excess of a metric of information interchange. You are ready to get a big amount of website visitors and consequently increase sales.

Sunday, September 27, 2009

How To Make Money From Blogs?

Advertising Programs - Perhaps the most obvious changes in the past few months have been with the addition of a variety of viable advertising options for bloggers looking to make money from their blogs. The most common way bloggers seem to earn money online is via the contextual ad program from Google - Adsense. A more recent addition that many are using successfully are Chitika’s eMiniMalls and WidgetBucks, Text Link Ads.


Azoogle Ads, Intelli Txt, DoubleClick, Tribal Fusion, Adbrite, Clicksor, AdHearUs, Kanoodle, Pheedo, TextAds, Bidvertiser, Fastclick and Value Click (to name just some of the options) and there is a smorgasbord of options. Of course there is more to come with MSN Adcenter and YPN both in beta testing and with a variety of other advertising system currently in development (YPN is only available to US publishers).

Lastly there’s BlogAds - one of the first blog specific ad networks.


RSS Advertising - The past 12 months have seen some advances in RSS Advertising also. I’m yet to hear of any bloggers making big money blogging through it to this point - but as improvements are made to the ad programs exploring this I’m sure we’ll start to see examples of it being profitable.


Sponsorship - In addition to the array of advertising programs that are available to join there is a growing awareness in the business of the value and opportunity that exists for them to advertise directly on blogs. I’m hearing more and more examples of this and have been fortunately to have a couple of ad campaigns of my own in the past month - one with Adobe a couple of weeks ago and another just completed with Ricoh for a new digicam over at my Digital Camera Blog. These are not isolated cases - as I say I know of many blogs exploring sponsorship with advertisers at present and suspect we’ll see more of it in the year ahead. Sponsorship is also happening on a post by post basis with some bloggers being paid to write on certain topics by companies - either in one off or a regular fashion - and they are able to make big money from their blogs doing so.


Affiliate Programs - There are larger affiliate programs like Amazon, Linkshare, Clickbank and Commission Junction but also literally thousands of others from the large to the very small.


Digital Assets - Increasing numbers of bloggers have been developing other digital assets to support and add revenue streams to their blogs. By this I mean that I’m increasingly seeing e-books, courses and tele-seminars being run by bloggers. My recent foray into this with the first series of the six figure blogging course that Andy and I ran a few weeks ago and have just released the study version of. This type of activity will only increase in future - in fact this week I’ve seen numerous examples of bloggers running courses.


Blog Network Opportunities - with the rise in popularity of Blog Networks - bloggers are also being presented with more places to earn an income from their blogging - by writing for and with others. While it might be difficult to get a writing gig with one of the bigger networks - there are plenty who are always asking for new bloggers to join and who are willing to pay bloggers using a variety of payment models. While there are distinct advantages of blogging for yourself - blogging for an established network who will handle a lot of the set up/promotion/admin/SEO etc has it’s advantages also. More and more bloggers are combining writing for themselves on their own blogs with taking on blog network blogs as additional income streams.


Business Blog Writing Opportunities - as blogging has risen in it’s profile as a medium more and more businesses are starting blogs. Many of these companies have internal staff take on blogging duties - but an increasing number of them are hiring specialist bloggers to come on and run their blogs. I know of a number of bloggers who in the past month or two have been approached for such paid work. Check out Bloggers for Hire if you’re looking for this type of work.


Non Blogging Writing Opportunities - Also becoming more common are bloggers being hired to write in non blogging mediums. Manolo’s recent coup of a column in the Washington Post is just one example of this as bloggers are increasingly being approached to write for newspapers, magazines and other non blog websites. Along side this is the rise of bloggers as published book authors - this is to the extent that one blogger I spoke with this week complained to me that they were one of the few bloggers than they knew who didn’t have a book deal!


Donations - Tip Jars and donation buttons have been a part of blogging for years now but this last year saw a number of bloggers go full time after fund raising drives. Perhaps the most high profile of these was Jason Kottke of kottke.org who through the generosity of his readership was able to quit his job and become a full time blogger.


Flipping Blogs - Also more common in 2005 was the practice of ‘Blog Flipping’ - or selling of blogs. This has happened both on an individual blog level (I can think of about 20 blogs that sold this year) but also on a network level (the most obvious of these being the 8 figure sale of Weblogs Inc to AOL).


Merchandising - My recent attempt to sell ProBlogger.net T-shirts wasn’t a raging success, but it is an example of how an increasing number of bloggers are attempting to make a few extra dollars from their blogs by selling branded products through programs like Cafepress. While I didn’t have a lot of success with merchandising - quite a few larger blogs are seeing significant sales - especially blogs with a cult following. I’m not at liberty to discuss details - but I know of one largish blog which will see sales over $20,000 in merchandise for the calendar year of 2005.


Consulting and Speaking - While it has been popular for established consultants to add blogs to their businesses we’re also starting to see bloggers with no consulting background able to make money by charging readers for their time in consulting scenarios BECAUSE of the profile that their blogs have built them. Blogging has the ability to establish people as experts on niche topics and we all know the value of being perceived as an expert. I spoke to one blogger last month who charges himself out at over $200 an hour for speaking and consulting work - his area of expertise was something that he knew little about 18 months ago - but through his blog he’s become a leader in his field and a minor celebrity in his industry.

As time rolls on there are more and more ways that bloggers make money from their blogs opening up. Feel free to suggest your own ideas and experiences in comments below.

Configure Outlook for Gmail POP3 Access

If you are viewing this page you should be here to configure Outlook for Gmail POP3 access. This page includes step-by-step instructions for configuring Gmail and Outlook to allow POP3 access for Outlook 2007 and earlier versions.

Note: If you want to set up IMAP access, go here instead.

One of the really nice things about Outlook 2007 is the way it can automatically configure email accounts at many of the major services. Gmail is one of those services.

Compare the instructions for automatically configuring a Gmail account in Outlook 2007 to those further down the page for earlier versions. Nine steps instead of 19. That's a major reduction in the work required to configure Outlook with Gmail.

Configuring Outlook 2007 for Gmail POP3 Access

Note: Travelers with laptops often find their normal SMTP server doesn't work when they are away from home, meaning they cannot send emails. If you're looking at Gmail as a way around this problem, there is an alternative.

SMTP2Go provides an SMTP server that was specifically designed to work from any location in the world. It comes highly recommended as it eliminates the "can't send email problem" and it really does work! Click here to visit the site.


If you are using Outlook 2007, follow these steps to configure Outlook for Gmail POP3 account use:
  1. In the Outlook main menu, click Tools, then Account Settings. This opens the Account Settings dialog box.

  2. Click New to launch the Add New E-mail Account wizard.

  3. On the Choose E-mail Service screen, select Microsoft Exchange, POP3, IMAP, or HTTP, then click Next.


  4. Enter your Gmail account information here for Outlook 2007.
  5. On the Auto Account Setup screen, enter your name (as you want it to appear in the From field of messages) into the Your Name field.

  6. Enter your full Gmail email address, which is your username followed by "@gmail.com", in the E-mail Address field.

  7. Enter your Gmail password in the Password field.

  8. Enter your Gmail password again in the Retype Password field, then click Next.

  9. Outlook connects to the Gmail servers, and assuming you entered your account information correctly, after a moment it displays the Congratulations! screen.

  10. Click Finish. Your Gmail account is configured.

That's the last step in the procedure to configure Outlook for Gmail. Now you can use the CTRL-1 keyboard shortcut to go to the Mail view.

Next press F9 to send and receive all mail. This downloads messages from Gmail. Seeing them in the Inbox will show that you were able to successfully configure Gmail as an Outlook email account.

Configuring Outlook 2003 or XP for Gmail POP3 Access

If you are not using Outlook 2007, follow these steps to configure Gmail and Outlook account use:
  1. In the Outlook main menu, click Tools, then E-mail Accounts. This launches the E-mail Accounts wizard.

  2. Select Add a new e-mail account, then click Next.

  3. Select POP3, then click Next.


  4. Enter your Gmail account information here for Outlook 2003.
  5. Enter your name (as you want it to appear in the From field of messages) into the Your Name field.

  6. Enter your full Gmail email address, which is your username followed by "@gmail.com", in the E-mail Address field.

  7. Enter your Gmail username in the User Name field.

  8. Enter your Gmail password in the Password field.

  9. Enter "pop.gmail.com" in the Incoming mail server (POP3) field.

  10. Enter "smtp.gmail.com" in the Outgoing mail server (SMTP) field.

  11. Click More Settings to open the Internet E-mail Settings dialog box.

  12. Click the Outgoing Server tab.

  13. Set the My outgoing server requires authentication check box.

  14. Select Use same settings as my incoming mail server.

  15. Click the Advanced tab.

  16. Under Incoming server (POP3), set the This server requires an encrypted connection (SSL) check box.

  17. Under Outgoing server (SMTP), set the This server requires an encrypted connection (SSL) check box.

  18. Change the number in the Outgoing server (SMTP) field to 465, then click OK.

  19. Click Test Account Settings. After a moment you should see a message that says all tests were completed successfully. If not, go back to the start of this procedure and check your work.

  20. Once you see the success message, click Next then Finish.
That's the last step in the procedure to configure Outlook for Gmail. Now you can use the CTRL-1 keyboard shortcut to go to the Mail view.

Next press F9 to send and receive all mail. This downloads messages from Gmail. Seeing them in the Inbox will show that you were able to successfully configure Gmail as an Outlook email account.


Friday, September 25, 2009

How To Delete The MSLicensing Key

On the Terminal Services Server

  1. Start Registry Editor (Regedit.exe or Regedt32.exe).
  2. Locate and then click the following key in the registry:
    HKEY_LOCAL_MACHINE\System\CurrentControlSet\Services\TermService\Parameters
  3. In this registry key, delete the following values:
    Certificate
    X 509 Certificate
    X 509 Certificate ID
  4. Quit Registry Editor, and then restart the server.

On the Windows XP-Based Client

  1. Start Registry Editor (Regedit.exe).
  2. Locate and then click the following key in the registry:
    HKEY_LOCAL_MACHINE\Software\Microsoft\MSLicensing
  3. Delete the whole MSLicensing key from the registry.
  4. Quit Registry Editor.
  5. Connect to the Terminal Services server.

Configure Roaming Profiles

When you sit at a computer and change its attributes, such as the wallpaper, when someone else logs on they still have the environment that they last had when they logged on, and this is achieved using a profile for the user which is stored locally in the %systemroot%/profiles/, e.g. d:\winnt\profiles\savillj.

If the user then sat at a different computer they would not have their setup, to achieve a profile that follows the user to different NT machines (a roaming profile) you need to store the users profile on a network share, that can be downloaded each time the user logs on. When the user logs off the network profile is updated, and a copy of the profile is saved locally. To configure roaming profiles perform the following

  1. Start User Manager for Domains (Start - Programs - Administrative Tools - User Manager for Domains)
  2. Double click on the user
  3. Click the Profiles button
  4. In the User Profile Path enter the network share location where the profile should go, \\\\ , e.g. \\bugsbunny\profiles\savillj.
  5. Click OK to finish

To make the profile mandatory, i.e. the user cannot change it, rename the file ntuser.dat to ntuser.man which is located at the base of the profile location.

As mentioned earlier, profiles are cached locally to machines, however this can be disabled by performing the following

  1. Start the registry editor (regedit.exe)
  2. Move to HKEY_LOCAL_MACHINE\SOFTWARE\Microsoft\Windows NT\CurrentVersion\Winlogon
  3. Create a value called DeleteRoamingCache of type DWORD (Edit - New - Dword)
  4. Set the value to 1

3 Sexual Foreplay Techniques to Use On a Woman


One of the most interesting things about giving women the kind of mind blowing orgasms that are guaranteed to have her wanting you more or more is in the fact that the real secret to giving her those kinds of experiences is in sexual foreplay.

What you may not know that sexual foreplay when done correctly starts way before she might even be beginning to think about sex.

In this article, you will learn 3 sexual foreplay techniques to use on a woman that will help you give her the most amazing mind blowing orgasms that she has ever experienced.

Sexual Foreplay Technique #1 - Turning her on when out in Public

Turning a woman on in public is both easy and effective for the same reasons which are it is unexpected and highly romantic.

It also lets the woman that you are with know that you find her attractive and the kind of woman that you want to be seen with.

Some things that you might want to consider doing with her in public are kissing or touching her in a provocative way.

Once you realize and remember that sexual foreplay starts long before sex you will find a variety of different ways in which you can turn her on.

Another great one to do in public is playing footsies underneath the table with her.

Sexual Foreplay Technique #2 - Creating the Right Kind of Mood or Ambience

Once the two of you are at your place you want to make sure that the environment that you will have her in will allow her to relax and at the same time become highly aroused.

Turning down the lights, lighting some candles and playing some soft and soothing music in the background is one of the best ways of creating the kind of atmosphere that will allow her to physically and mentally be ready for the sexual experience.

Sexual Foreplay Technique #3 Sensual Massage


Hands down giving a woman a sensual massage is the most effective foreplay technique that you can use especially if you are planning on ending the night by giving her the most intense and mind blowing orgasm that you can think of.

In terms of preparing a woman for sex, nothing is as good as giving her a sensual massage. One tip that you are going to want to consider when giving a woman a sensual massage is using a massage oil that has pleasant fragrance to it and at the same time warms her skin her as well.

Since the two of you are still in the sexual foreplay phase and not at the sexual intercourse one yet, start off by rubbing her shoulders and necks then moving your way down to her back and legs.

From this point you are going to want her to roll over and if you truly do have the magic touch she is going to be wet in anticipation of what is going to come next.

However, while she might be ready for more your goal during sexual foreplay is to get her as highly aroused as possible which means continue to give her a massage and then at the end move to her more sexual parts such as her breast, vagina, and clitoris.

Once, you find yourself at the point where you are ready to stimulate her clitoris and move on to more sexual intercourse type activities apply G Female Stimulating Gel underneath the hood of her clitoris and gently massage it in.

At this point, if you did the 3 sexual foreplay techniques above correctly and effectively it will be only a matter of moments that the woman that you are with has the kind of mind blowing orgasms that make all that time you spent on sexual foreplay worthwhile.

Configure Radius Authentication for SSH login Centos 5.2 Linux

Using the plug-in modular nature of PAM we can get a linux server to use RADIUS to authenticate users connecting via SSH. This guide tells you how to setup a Centos 5.2 server as your Radius "client" and Juniper Steel-Belted as your radius server authentication "server". We are going to use the pam_radius_module from free radius to provide the mechanism of authenticating ssh logins against a radius box.

For this example my environment consists of

A centos 5.2 radius client called "cyclone"
A Steel-Belted Radius server is called "turbo"
A username of dave

Of course you will change these silly names to the hostnames or ip addresses that suit your own setup.

Preparation

We have to to build a radius client module for our centos linux server so some preperation is required on this box to enable us to do that. It isn't as complex as it sounds.

1. Install the correct development tools

Since the pam_radius_auth security module is not available in mighty yum repository we have to make this ourselves using the source files. To do this we need the correct C compiler this can be installed via yum using the following command

yum install gcc-c++

After a little while the C compiler will be installed an ready for use. The next requirement is the pam development module. This is also installed via yum with this command:

yum install pam-devel

2. Download the pam Radius source files.

You need to download the radius pam module here ftp://ftp.freeradius.org/pub/radius/

Choose the file pam_radius-1.3.17.tar.gz

This is done easily via the wget command. So from the centos machine run

wget ftp://ftp.freeradius.org/pub/radius/pam_radius-1.3.17.tar.gz

download this to a temporary folder where you can build the software from

I chose a directory called pam under my root users home directory

/root/pam

Once the file is downloaded unzip the file with gunzip

using the command

gunzip /root/pam/pam_radius-1.3.17.tar.gz

untar the file using the command

tar -xvf /root/pam/pam_radius-1.3.17.tar

this should then upack the contents into a directory structure like this

/root/pam/pam_radius-1.3.17

change to this directory and type

make

the system should then compile with something like the following output:


cc -Wall -fPIC -c pam_radius_auth.c -o pam_radius_auth.o
pam_radius_auth.c: In function âtalk_radiusâ:
pam_radius_auth.c:886: warning: pointer targets in passing argument 6 of ârecvfromâ differ in signedness
pam_radius_auth.c: In function âpam_sm_authenticateâ:
pam_radius_auth.c:1102: warning: assignment from incompatible pointer type
cc -Wall -fPIC -c -o md5.o md5.c
ld -Bshareable pam_radius_auth.o md5.o -lpam -o pam_radius_auth.so

this should create a file called

pam_radius_auth.so

copy this to the /lib/security/ folder.

Configure the Centos Server to use radius Authentication

1. Create a user you wish to login as on the centos system I am creating one called "dave" fo this example.
useradd -d /home/dave/ dave

NOTE: There is no reason to set a password to this unix user as you will be using your radius account to provide the password.

2. Create the client configuration file folder structure.
Create a directory under the /etc folder called raddb.
So you have a directory path which looks like /etc/raddb
This is done like so
mkdir /etc/raddb

3. Copy the sample client configuration file pam_radius_auth.conf to /etc/raddb/server
This sample file is found in the unarchived folder you downloaded earlier - in my example so I would run.
cp /root/pam/pam_radius-1.3.17/pam_radius_auth.conf /etc/raddb/server

3. Edit the /etc/raddb/server to match the radius server "turbo".

open the /etc/raddb/server in an editor such as vi
Under the section that looks like

# server[:port] shared_secret timeout (s)
127.0.0.1 secret 1
other-server other-secret 3

Add a line that represents your radius server. You will need to enter your servers hostname or IP address and a sharesecret that you will need to assign in this file and on your radius server. So make a note of this password.

I am going to add my radius server "turbo" and specify a shared secret of "s3cret" after editing my file looks like this


# server[:port] shared_secret timeout (s)
127.0.0.1 secret 1
turbo s3cret 3

Now edit the /etc/pam.d/sshd file. This file controls the authentication method for sshd service which facilitates SSH logins. We need to tell it to use the /lib/security/pam_radius_auth.so file we created compiled earlier.

Before the top line

auth include system-auth

add this line

auth required pam_radius_auth.so

so the first two lines will look like this


auth sufficient pam_radius_auth.so
auth include system-auth

This will tell the SSH service / daemon to use the radius protocol and server for authentication. By leaving the line

With this configuration the SSHD will also check local system sccount passwords as a fall back. This means you can log in as root or other unix local accounts should your radius server be off line.

NOTE! You are changing the authentication method for logging in to your centos box via SSH. Make sure you can get into it via console (monitor mouse and keyboard) in case this goes wrong and you get locked out of SSH

Configure your Steel Belted Radius Server

1. Setup Cyclone as a radius client

Right "Click Radius Clients"
Click ADD
In the Add RADIUS client window add the IPaddress or hostname of the centos cyclone box and add the shared secret we decided on earlier in this example "s3cret"

2. Add a username on the radius box "turbo"

Right "Click users"
Click Add

Add a native user and set a password.

Test a Logon to the Centos SSH service

Fire up your SSH client

Connect to the box and login as the user and password you set on radius server earlier. In my case "dave"

If it lets you voila job done you have used the radius server to provide SSH authentication. If it doesn't then you might start by looking in the /var/log/secure/file for clues. Also the centos forum is pretty good I often find some helpful people on there - if you are really desperate you can leave a comment here! :)